
Deploying Unity Builds to Google Play Store


Deploying Unity Builds to Google Play Store
Getting your game onto the Google Play Store involves a complex dance of signing keys, version codes, and console configurations. Manually building an Android App Bundle (AAB), signing it, and uploading it to the Play Console every time you want to test a change is a recipe for burnout.
In this guide, we’ll walk through how to automate your Unity builds for Android and deploy them directly to the Google Play Store internal testing track using GitHub Actions.
Table of Contents
- Prerequisites
- Setup Overview
- Setting up Google Play Console
- Configuring Google Cloud Access
- Handling the Keystore
- Updating the Build Pipeline
- Deploying to Internal Testing
- Installing the Internal App and Inviting Testers
- About Buildalon
Prerequisites
Before we start, make sure you have:
- Google Play Developer Account: You need to be able to access the Google Play Console.
- Working Unity Build: You should have a basic automated build pipeline set up. Check out our GitHub Actions Unity guide if you’re starting from scratch.
Setup Overview
Automating Android deployments involves two key security components: Android Keystores (for Android Signing) and Service Accounts.
- App Registration: Create the app placeholder in Google Play Console.
- Authentication: We’ll use Workload Identity Federation to securely authenticate GitHub Actions Android workflows with Google Cloud.
- Keystore: We need to securely provide our signing keystore to the build server.
- Build & Upload: We’ll update the workflow to build an Android App Bundle (
.aab) and upload it.
Setting up Google Play Console
First, let’s make sure Google is expecting our app.
- Log in to Google Play Console.
- Click Create app.
- Fill in the app details (Name, Default language, Game/App type).
- Important: Manually build your APK/AAB in Unity and upload it to the Internal Testing track via the web interface. This initializes the track, sets the Package Name permanently, and allows you to answer the initial regulatory questions (Data Safety, etc.).
Configuring Google Cloud Access
To allow GitHub Actions to upload via the API, we need to link our Google Play account to a Google Cloud project. We will use a modern, secure method called Workload Identity Federation.
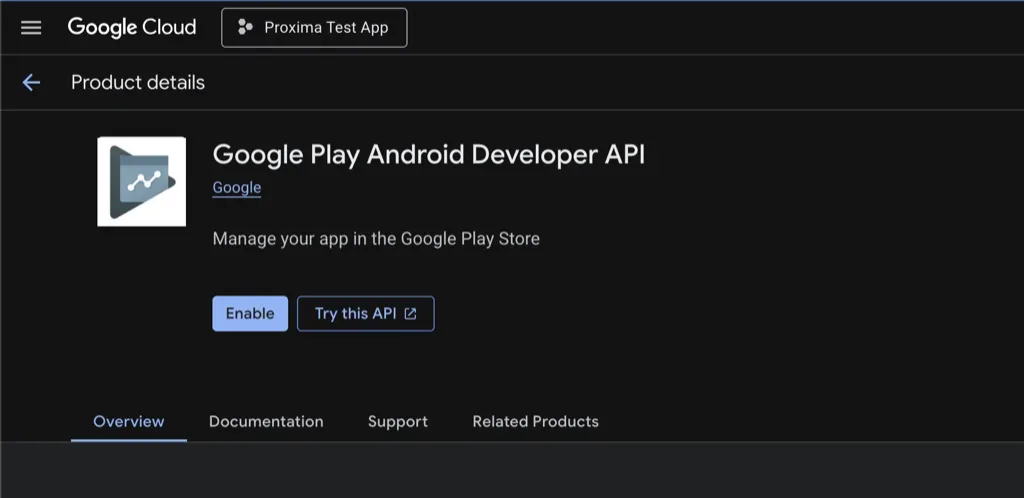
1. Enable the Google Play Android Developer API
- Go to the Google Cloud Console.
- Select or create a project for your game.
- Search for Google Play Android Developer API and enable it.
2. Create a Service Account
- In Google Cloud Console, go to IAM & Admin > Service Accounts.
- Click Create Service Account.
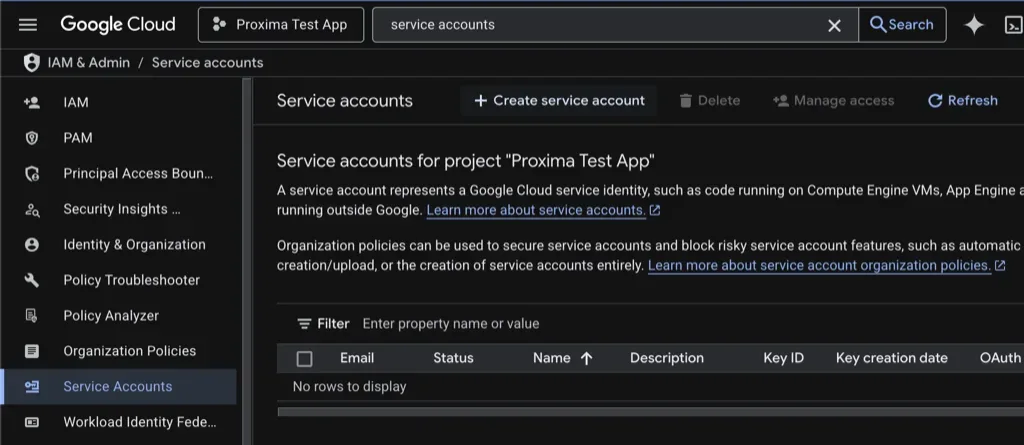
- Name it something like
unity-cicd-uploaderand click Create and Continue. - Skip the role assignment steps (click Continue then Done). This service account does not need specific Google Cloud permissions, only Google Play permissions.
- Copy the email address (e.g.,
unity-cicd-uploader@my-project.iam.gserviceaccount.com). - Go back to Google Play Console > Users and permissions and invite this email.
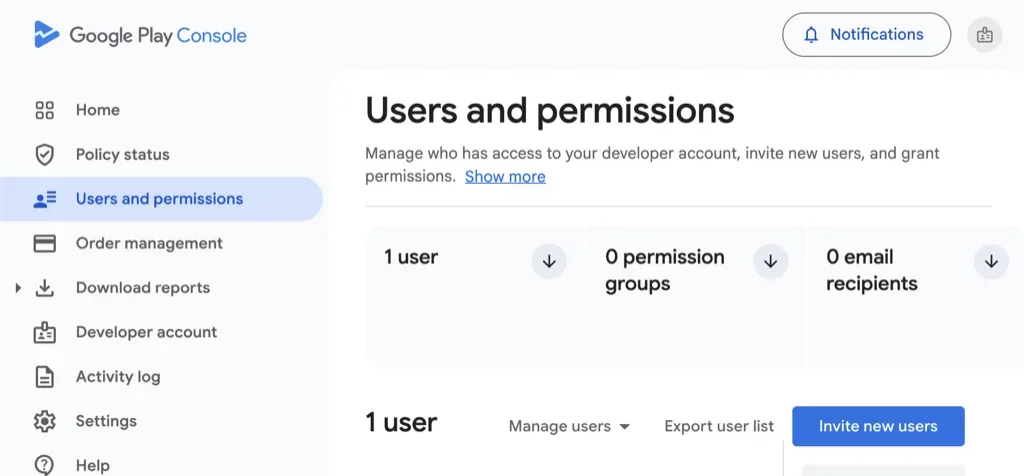
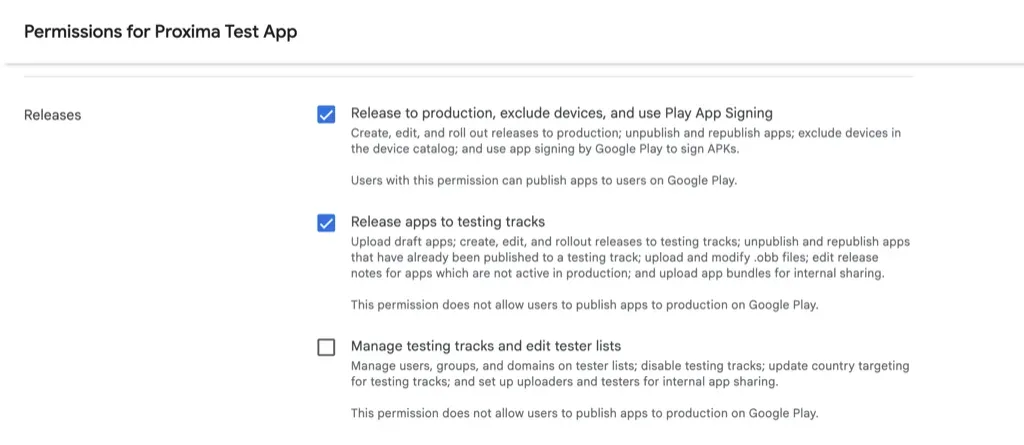
- In the permissions tab, grant it App Access to your game, and under Account permissions, ensure it has Releases to play store > Release to testing tracks (or Admin if you want full control).
3. Setup Workload Identity Federation
Next we need to give have the action runner authenticate with the service account we created. A secure way to do this is to use Workload Identity Federation, which procides an secure authentication scheme between GitHub Actions and Google Cloud.
- In Google Cloud Console, go to IAM & Admin > Workload Identity Federation.
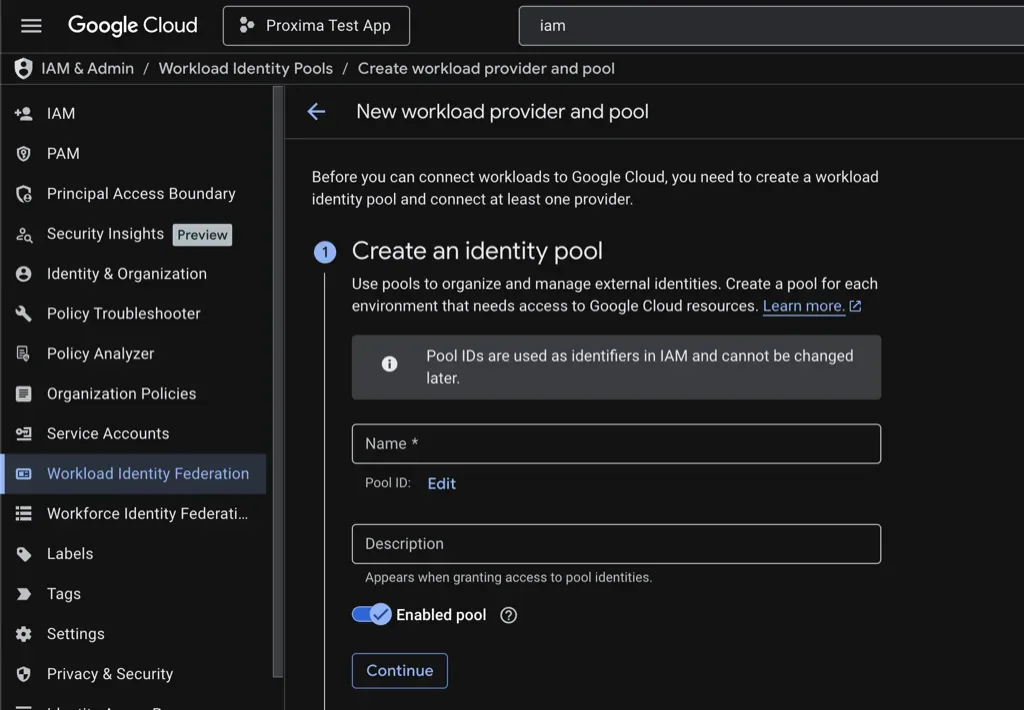
- Create a Pool (e.g.,
unity-cicd-pool). - Create a Provider inside that pool:
- Type: OpenID Connect (OIDC)
- Provider name:
unity-cicd-provider(or any descriptive name - you will reference it in the workflow) - Issuer (URL):
https://token.actions.githubusercontent.com - Audience:
sts.amazonaws.com(Standard default for GitHub Actions). - Provider attributes (attribute mapping):
google.subject=assertion.subattribute.repository=assertion.repositoryattribute.ref=assertion.refattribute.actor=assertion.actor- Condition: Use a minimal repo lock like
attribute.repository == "owner/repo", for example `attribute.repository == "virtualmaker-net/proxima"
- After creating the provider, go back to the page for your pool and at the top click Grant Access. Select Grant access using service account impersonation and choose your service account created in the previous section. Set the principals to
repositoryand the value to yourowner/repo.
Handling the Keystore
Your Android Keystore is the identity of your app. If you lose it, you can’t update your app. If it’s stolen, someone else can update your app.
For CI/CD, we have two common approaches:
- Base64 Encode: Encode the
.keystorefile to a base64 string and store it as a GitHub Secret. - Repo Storage: Commit the keystore file to your repository (if private) or encrypted.
Method 1: Base64 Encoding (Recommended)
This method keeps your keystore out of your repository entirely.
Encode: Run one of the following commands to turn your file into a text string.
macOS / Linux:
openssl base64 -in user.keystore -out user.keystore.base64.txtWindows (PowerShell):
[Convert]::ToBase64String([IO.File]::ReadAllBytes("user.keystore")) | Set-Content user.keystore.base64.txtStore: Copy the contents of the text file and add it as a secret named
ANDROID_KEYSTORE_BASE64.
Method 2: Repo Storage
You can commit the keystore file to your repository (e.g. in Assets/Keys/user.keystore), but this is risky. If your repo is ever compromised or made public, your signing key is exposed. If you choose this route, ensure your .gitignore does not ignore .keystore files.
Regardless of the method, go to your GitHub Repository > Settings > Secrets and variables > Actions and add:
ANDROID_KEYSTORE_PASSWORD: The password for your keystore.ANDROID_KEYALIAS_PASSWORD: The password for your key alias (often the same as the keystore, but not always).
Updating the Build Pipeline
Now let’s update our workflow to include the Android build, Google Cloud authentication, and Play Store upload steps. We’ll be using the following actions:
- google-github-actions/auth - Authenticates with Google Cloud via Workload Identity Federation.
- RageAgainstThePixel/upload-google-play-console - Uploads an AAB to the Google Play Console.
Create or update your .github/workflows/unity-build.yml file with the following configuration:
name: Deploy to Google Play

on:
  push:
    branches:
      - main

# Required for Workload Identity Federation
permissions:
  id-token: write
  contents: read

jobs:
  build-and-deploy:
    name: Build & Deploy to Google Play
    runs-on: buildalon-windows

    steps:
      # Checkout the repository
      - uses: actions/checkout@v6
        with:
          lfs: true

      # Setup Unity with Android build support
      - uses: buildalon/unity-setup@v2
        with:
          build-targets: Android

      # Activate Unity License
      - uses: buildalon/activate-unity-license@v2
        with:
          license: 'Personal'
          username: ${{ secrets.UNITY_EMAIL }}
          password: ${{ secrets.UNITY_PASSWORD }}

      # Add the Buildalon command line package to your Unity project
      - name: Add Build Pipeline Package
        working-directory: ${{ env.UNITY_PROJECT_PATH }}
        run: |
          npm install -g openupm-cli
          openupm add com.virtualmaker.buildalon

      # Decode base64 keystore from GitHub Secrets
      - name: Decode Keystore
        run: |
          echo "${{ secrets.ANDROID_KEYSTORE_BASE64 }}" | openssl base64 -d -out ${{ github.workspace }}/user.keystore

      # Build the Android App Bundle (.aab)
      - uses: buildalon/unity-action@v3
        name: Build Android AAB
        with:
          build-target: Android
          args: >-
            -quit -batchmode
            -executeMethod Buildalon.Editor.BuildPipeline.UnityPlayerBuildTools.StartCommandLineBuild
            -keystorePath ${{ github.workspace }}/user.keystore
            -keystorePass "${{ secrets.ANDROID_KEYSTORE_PASSWORD }}"
            -keyaliasName "my-key-alias"
            -keyaliasPass "${{ secrets.ANDROID_KEYALIAS_PASSWORD }}"
            -appBundle
          log-name: Android-Build

      # Authenticate with Google Cloud using Workload Identity Federation
      - uses: google-github-actions/auth@v3
        with:
          # The service account email from Google Cloud
          service_account: unity-cicd-uploader@my-project.iam.gserviceaccount.com
          # The full resource name of the Workload Identity Provider
          workload_identity_provider: projects/123456789/locations/global/workloadIdentityPools/unity-cicd-pool/providers/unity-cicd-provider

      # Java is required by the Play Console upload tool
      - uses: actions/setup-java@v5
        with:
          distribution: temurin
          java-version: 21

      # Upload the AAB to the Google Play Internal Testing track
      - uses: RageAgainstThePixel/upload-google-play-console@v1
        with:
          github-token: ${{ secrets.GITHUB_TOKEN }}

          # Directory containing the .aab file
          release-directory: ${{ env.UNITY_PROJECT_PATH }}/Builds/Android

          # The track to upload to (internal, alpha, beta, production)
          track: internal

          # Draft status lets you review before rolling out
          status: draft

          # Optional release notes
          metadata: |
            {
              "releaseNotes": {
                "language": "en-US",
                "text": "${{ env.RELEASE_NOTES }}"
              }
            }
Key Steps Explained
- Decode Keystore: Converts the base64-encoded keystore secret back into a file for signing. If you checked in your keystore, you can skip this step.
- Build Android AAB: Runs the Unity build with keystore credentials and
-appBundleto produce an.aabinstead of an.apk. Replacemy-key-aliaswith the alias you chose when creating your keystore in Unity (Project Settings > Player > Publishing Settings). - Authenticate with Google Cloud: Uses Workload Identity Federation to get a short-lived token. You need to replace two values:
service_account: The email address from step 2.5 above (visible on the Service Account details page in Google Cloud Console under IAM & Admin > Service Accounts).workload_identity_provider: The full resource name of the provider. You can find this in IAM & Admin > Workload Identity Federation, click your pool, then click your provider, and copy the Default audience or Resource name value. It follows the formatprojects/PROJECT_NUMBER/locations/global/workloadIdentityPools/POOL_ID/providers/PROVIDER_ID. Your Project Number (not Project ID) is on the Google Cloud Console Dashboard or Project Settings page.
- Upload to Play Console: Pushes the
.aabto the internal testing track as a draft, so your team can test immediately.
We are deploying to theNote
internaltrack. This is usually the best place for automated builds so your team can test them immediately.
Deploying to Internal Testing
Once you push these changes, your workflow should:
- Build the Android App Bundle (
.aab). - Authenticate with Google Cloud.
- Upload the
.aabto the Internal Testing track on the Play Console.
When the upload finishes, your testers in the Internal Testing email list will receive an update (or see it in the Play Store if they have it installed).
Common Gotchas
- Android Version Code: Google Play requires a unique integer
versionCodefor every single upload. Ensure your build script increments this on every build (e.g., using${{ github.run_number }}) in your Unity Android Build settings or build script. - Android Build Number: Similar to
versionCode, the user-visiblebundleVersion(or Unity App Version) should be updated to help testers identify which build they are on. - Play App Signing: When you create your app in the console, you likely opted into Play App Signing. This means Google manages the key used to sign APKs delivered to users. The keystore we configured above is your Upload Key. If you lose it, you can contact Google support to reset it, whereas the final signing key is safely stored by Google.
- API Delays: Sometimes the Google Play API takes a few minutes to process a new build.
- Permissions: If you get a 403 error, double-check that the Service Account email is added to the Google Play Console Users with the correct permissions and linked to the Google Cloud project.
Installing the Internal App and Inviting Testers
After your first successful upload to the internal track, you need to explicitly invite testers and share the opt-in link.
Invite Internal Testers
In the Google Play Console:
- Open your app and go to Testing > Internal testing.
- Open the Testers tab.
- Create an email list (or select an existing one) and add tester emails.
- Save the list and make sure it is attached to your internal test track.
- Copy the Opt-in URL from the internal testing page.
Share that opt-in URL with your testers. They must accept the invite using the same Google account you added to the tester list.
How Testers Install the Internal Version
- Tester opens the opt-in URL and taps Become a tester.
- Tester taps the Play Store link shown on that page.
- Tester installs the app (or updates it if already installed).
If the app is already installed from another source (for example, a local APK), the tester may need to uninstall it first if the signing key or package signature does not match the Play build.
For later releases, once users are opted in, they usually receive updates through the Play Store automatically (or via manual update if auto-update is disabled).
About Buildalon
Buildalon provides verified GitHub Actions and dedicated build infrastructure to streamline Unity development. Register for Buildalon to get support with your Unity build automation needs.
Further Reading
- How to Download and View Unity Logs from Your Game
- Git and Unity: A Comprehensive Guide to Version Control for Game Devs
- Automating Unity Builds to iOS, macOS, and visionOS
Subscribe to our Newsletter
Get the latest news and updates from Virtual Maker delivered straight to your inbox.
© 2026 Virtual Maker Corporation